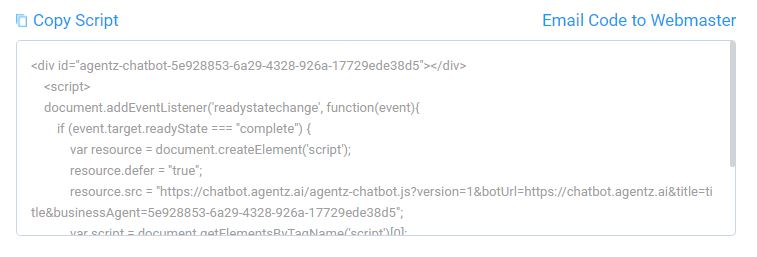
Here you can copy the javascript code that needs to be placed on your website in order to launch the digital receptionist. You can use the Copy Script feature to copy and paste it yourself within the header of your website or use the Email Script feature to send it to your webmaster.
Enabling the Digital Receptionist
Make sure that you set the toggle to ‘Yes’ to have the digital receptionist appear on our website once the javascript pixel is added.

View our quick video on the quick and easy steps it takes to set up and launch your bot.
You can turn off the digital receptionist without removing the code from your website.
1. Just login to your dashboard and click on the Settings icon on the lower left hand of your menu.
2. Click on the Install Chatbot card
3. Set the toggle for “Enable digital receptionist on my website” to ‘No.’

To turn back on at any time, simply move the toggle back to ‘Yes.’
Your automated assistant allows you to choose from three different AI modes providing control over how you want your automated assistant to respond to customer queries. Curated mode provides you with the most security and control, while Creative mode, offering the least control, provides the ability to respond to any question even if it is not in your Q&A knowledgebase or found on your website.
The three modes are:
CURATED – Your automated assistant will attempt to answer user queries based on your curated Question & Answer knowledgebase. It will not use your website content or any other creative AI capabilities to respond. If unable to answer, it will allow your customer to submit a question directly to you and you will receive an alert.
ENHANCED – Your automated assistant will attempt to answer user queries based on your Q&A knowledgebase or website content. If unable to answer, it will allow your customer to submit a question directly to you and you will receive an alert.
CREATIVE – Your automated assistant will attempt to answer user queries based on your Q&A knowledgebase and website content. If unable to answer, it will provide an appropriate response, on its own, using generative AI. Responses using Creative mode may or may not be completely accurate. For example, Creative mode is great at answering general industry-specific informational questions but likely will not be able to answer questions about your pricing or business policies.
To select or change your mode:
> Log into your console and click on the Setup icon in the lower left menu
> Click on the “Setup AI Mode” tile under the Customize your Automated Assistant section
> Toggle ‘Yes’ or ‘No’ to achieve the mode you wish to use
Note that Curated mode will always be toggled to the ‘Yes’ position as your automated assistant will always use your Business Profile information when responding to certain questions. In order to select ‘Creative’ both Curated and Enhanced must also be selected.
For websites that disallow AI scripts to read them, continue to toggle this mode to ‘Yes’ if you want to use ‘Creative’ mode.
If you schedule appointments with your customers, Appointment Settings allows you to automate that process.
Do you want the automated assistant to take an appointment request?
Set the toggle to ‘Yes’ if you schedule appointments with your customers and would like the automated assistant to manage that process for you. If not, set the toggle to ‘No.’
Do you allow customers to book appointments via online scheduler?
Set the toggle to ‘Yes’ and then enter the link to the URL where customers can schedule appointments with you online. Common online scheduling systems include Calendly, Google Calendar, Booker, etc. Set the toggle to ‘No’ if you do not offer online booking.
NOTE: if you set the first question to ‘Yes’ but the second to ‘No’ the automated assistant will provide users who want to schedule an appointment with you a form field within the chat window to submit their contact information and preferred day/time. You will then receive an alert whenever somebody submits an appointment request so that you can confirm with them using the Agentz chat, by emailing or calling them back.
Do you want to activate Live Support?
This setting allows you to decide if you want website visitors to request live help at any time. When the feature is on, you will receive a text and email alert when a live user requests assistance.
Set the toggle to ‘Yes’ if you would like to give website visitors the ability to request live help. If not, set the toggle to ‘No.’
NOTE: When a user requests live help, if you do not respond to them within two minutes, the automated assistant will let them know that you are not currently available and give them the opportunity to submit their contact information and request to your or follow-up. You will be notified via text and email when you receive a new lead.
Your digital receptionist uses this information when responding to basic customer inquiries about your business. Always keep this up-to-date, especially your phone number information.
Business Name
Enter the customer-facing business name that you use.
Website
Enter your website URL that the digital receptionist will be used on.
Short Summary about your Business
Your response here will be used when a website visitor requests to learn more about your business when engaging with the digital receptionist. Be sure to provide a highlight about your service offering, the types of customers you serve including service area and anything else that you believe differentiates you from your competition. 300 – 500 characters is the recommended length.
Link to your “About Us” website page
Enter the page on your URL that website visitors should go to to learn more about your business. It could be an About Us page or Services page.
Address
If you are a business that customers come to, enter your full business street address. If you go to your customers or are a national business, just enter your city and state.
Primary Phone Number
Enter the phone number customers should use if they want to call you.
Mobile Phone Number
Enter one or more mobile numbers for you and anyone else on your team that will be responding to customer inquiries and follow ups. Your mobile device will receive a text when a customer is engaged with the digital receptionist and requests live support, when a customer texts you a message or when you miss a call so that you can respond quickly to that caller.
Email Address
Enter one or more email addresses for you and anyone else on your team that will be responding to customer inquiries and follow ups. We will send you an email when a customer is engaged with the digital receptionist and requests live support, when a customer texts you a message or when you miss a call so that you can respond quickly to that caller.
Business Hours
This is a free text field that allows you to indicate when your business is open or when you serve customers. There is no specific format required.
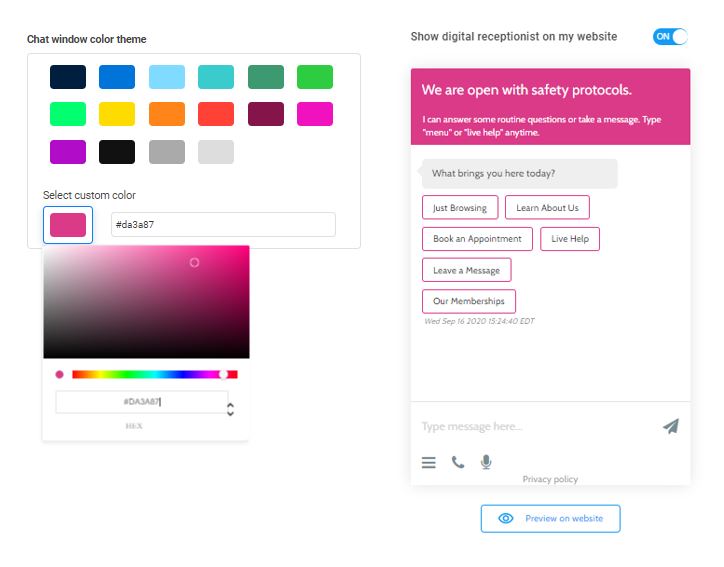
Here you can select the color you want your chat window to use.
Choose a color from the swatch board or enter your own specific 6-digit hex code.
When your digital receptionist first launches, you can choose which size you want the window to start at. We offer: Full Window, Medium Window and Small Window. When a user is on your website they can reduce or expand the size of the chat window at will. Click on the buttons for each of the three options to see how it will look on your website.
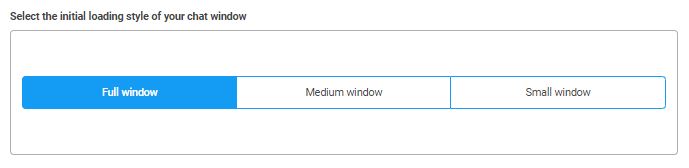
When your digital receptionist first launches, you can choose which size you want the window to start at. We offer: Full Window, Medium Window and Small Window. When a user is on your website they can reduce or expand the size of the chat window at will. Click on the buttons for each of the three options to see how it will look on your website.
NOTE: For optimal user experience, the chat window will open in Medium window mode on mobile devices, even if Full window mode is selected.
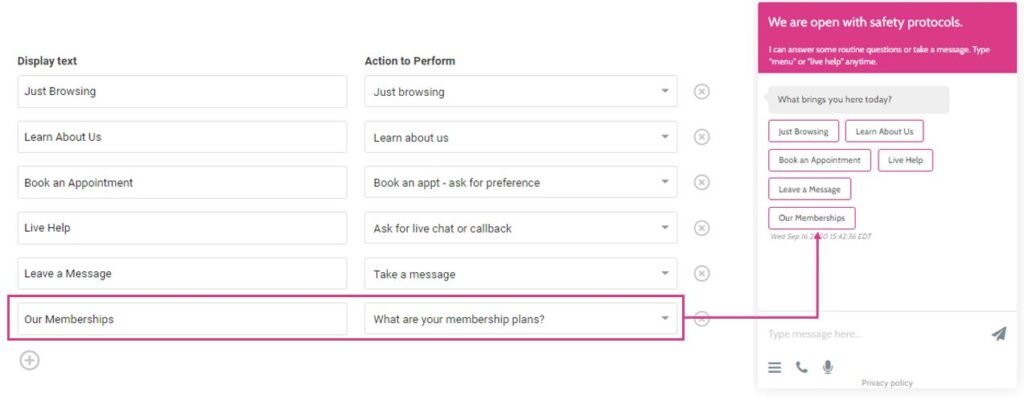
Adding your own custom buttons to the Main Menu is a great way to promote information commonly seeked by website visitors.
To add your own button action, click on the + symbol. This allows you to enter your own button text and then select an action from the drop-down list. Within the drop-down will be the pre-set options available as described above as well as questions from your library’s question & answer list. This is a great way to include a button for specific information you want to call out.
Example:
A fitness gym wants to call out their membership plans in the menu buttons. They would create a question & answer in their library that asks the question “What are your membership plans” and provides the answer. They may even choose to include a link to a memberships page.
In the Main Menu Customization, they would add a new button that reads something like “Membership Plans” and then select their “What are your membership plans” question in the Action to Perform drop-down menu.
Watch our video to learn more:
Here you can control the initial conversation prompts that are available when a user first engages with the digital receptionist.
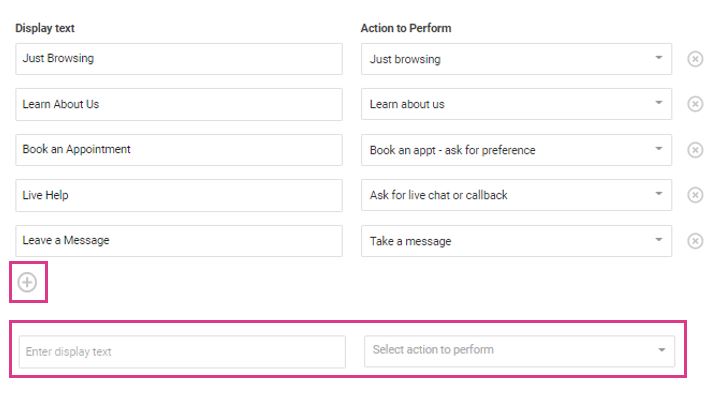
Update Menu Buttons
You can also update the button options available to users. Stick with the default options or remove ones you don’t want to make available. You can also add your own custom buttons to answer specific questions or drive users to a specific piece of information or page on your website.
The Display Text field allows you to determine how you want the button to read to users.
The Action to Perform field allows you to select from a list of available options:
Just Browsing – This engages the website visitor. Choosing this takes them through a conversational flow of information about the business. Elements including images, videos, special offers, reviews and business information can be shown.
Learn About Us – Will take the website visitor through a similar conversation as Just browsing but also includes more information about products and services with the intent of driving to a lead.
Book an Appt – take Appt Request – This provides the ability to drive the user directly to your online booking link or shows a form for the user to submit their contact information and preferred date(s)/time(s).
Ask for Live Chat/Callback – Allows the user to request live assistance through the chat or request a call back.
Take a Message – Allows the user to submit their contact information along with a message so that they can be contacted back.
To remove a button from the digital receptionist menu:
1. Login to your dashboard and click on the Settings icon on the lower left hand of your menu.
2. Click on the Chatbot Menu card
3. Identify the button you want removed from your menu and click on the X to the right of it.
You can view how the new menu will look on the right-hand side of the screen in the sample menu view:

Adding your own custom buttons to the Main Menu is a great way to promote information commonly seeked by website visitors.
To add your own button action, click on the + symbol. This allows you to enter your own button text and then select an action from the drop-down list. Within the drop-down will be the pre-set options available as described above as well as questions from your library’s question & answer list. This is a great way to include a button for specific information you want to call out.
Example:
A fitness gym wants to call out their membership plans in the menu buttons. They would create a question & answer in their library that asks the question “What are your membership plans” and provides the answer. They may even choose to include a link to a memberships page.
In the Main Menu Customization, they would add a new button that reads something like “Membership Plans” and then select their “What are your membership plans” question in the Action to Perform drop-down menu.
How does Connect Now work?
The Connect Now widget allows customers to submit their mobile number and launch an SMS conversation on their mobile device.
Unlike the standard chatbot window, Connect Now can be placed anywhere on your website, landing page, or other digital property where you have the ability to insert a simple javascript.
Connect Now is great for capturing more leads while allowing customers to self-service their needs.
How do I install Connect Now?
After setting up your Connect Now button through the Connect Now page of your Settings, simply place the javascript wherever you want it on your website or landing page.
For WordPress websites, you can either use a text block and insert the javascript as code or use a plugin, such as WP Code, to insert the script.
Great places to include the script are in the body of your website, the header or the footer.
Can I customize the Connect Now widget so that it matches my site?
Customization options we offer for Connect Now are button color, button size, button font, button font size and button font color.
You can also choose between an embedded widget or you can display the mobile number input field via a dialog box.
We also provide Captcha which can be added if you wish.
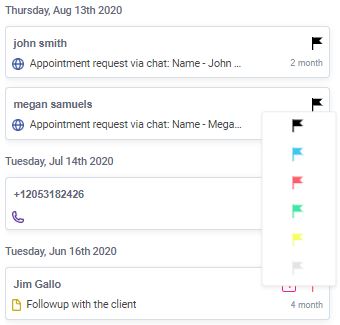
The colored flags allow you to mark individual website visitors for follow-up, urgency, closure, etc. Use the six colors anyway you like – it could be the status of the lead or it could be who owns the lead. You decide!
The flag will always default to black. To change the color, simply click on the flag and then click on the color you want to change it to.
Log into your console and go to the Setup screen.
> Click on the Knowledgebase and Custom Q&A card
> Click on Upload to Knowledgebase
> Click on the Documents tab, and then on the Add New Document button
> Click on the Select File button and locate the file you want to upload from your computer’s folder.
> Once you have chosen you document, click on the Upload Files button
Note that you can upload documents in PDF, DOC, or TXT format and they must be no larger than 8 megabytes. Your AI bot can read text documents as well as information within tables. However, it can’t view or read images.
It takes about 3 to 5 minutes for the bot to be trained on the content in your document. Your screen will show you the status. Once complete, your bot will be ready to respond to questions that can be answered by the document content.
Watch video to learn more:
Scanning your website is the fastest way to train the AI to handle customer questions.
By scanning each page of your website, the AI learns about your business and uses the content to answer customer questions.
The more website pages of content you have, the better. For many businesses, this may be the only step needed to train the AI.
> Click on the Knowledgebase and Custom Q&A card
> Click on Upload to Knowledgebase
If your bot was able to scan your website upon original account creation, you will see the list of pages here and whether the scan was successful or not.
A successful scan means the AI was able to read the content on that page. Note that some websites are unable to be scanned if they have technology that prevents content scraping. Sometimes a page can be scanned but certain sections of a page can’t.
If you add new pages to your website and want them scanned or if you have other website resources on a different domain, you can add them at any time.
Just click on the Add New Link button.
Enter the URL of the link to be scanned and press the ‘Add Link’ button.
Give your bot about 2 – 3 minutes to scan and train itself on the content and you’re done.
Once training is complete, your bot is ready to answer questions about your business.
Watch video to learn more:
If you have purchased a package that includes SMS auto-reply or missed call handling, you will want to provision a unique tracking number to setup those features.
Provision a Tracking Number
In order to set up missed call handling or auto-replies to text messages and customer alerts, you will need to provision a tracking number first. To do so:
1. Login to your dashboard and click on the Settings icon on the lower left hand of your menu.
2. Click on the Missed Call Handling card.
3. Simply enter the area code of your business number and a tracking number will be provisioned for you. In some cases, if a tracking number is not available in your specific area code, you may need to enter another area code that also services your area.
Setup Missed Call Handling
Once you have completed setup within the digital receptionist, you then need to setup call forwarding from your main business number using conditional call forwarding. Most phone providers offer a way to setup call forwarding either through your online account with them or by simply giving them a call. For instructions on how to setup call forwarding for many of the common carriers, view our Call Forwarding Setup Guide.
On the Missed Call Handling card:
1 – Set the “Play voicemail greeting to missed calls?” to ‘Yes.’
2 – In the ‘Voicemail greeting’ field enter a brief message. Feel free to use the default or customize your own. This is the message that will play when a missed call occurrence takes place
3 – In the ‘Auto-reply SMS to the caller’ field enter a brief message for the text alerts. Feel free to use the default or customize your own. This will send to missed callers a text message from you acknowledging their call. This provides callers with the assurance that you will get back to them shortly.
NOTE: Message voice recordings will be available in your digital receptionist Inbox.
Watch our video to learn more:
You are not required to set up missed call handling. To opt out of missed call handling, simply avoid setting up call forwarding from your business line to your digital receptionist number. As long as you provision a digital receptionist number by going to Settings > SMS Auto Replies, you will still be able to take advantage of SMS auto-replies to your customers when they text you.
For instructions on how to setup call forwarding for many of the common carriers, view our Call Forwarding Setup Guide.
Customers appreciate visuals so the information that you provide in this section can be highly valuable, encouraging website visitors to reach out to you for a quote, an appointment or to make a purchase.
TIP: Many users leverage the digital receptionist to show new products or services images and videos quickly as it can be faster than having a webmaster upload to the website.
We recommend at least 3 – 5 images and 1 – 2 videos if you happen to have them. Just be sure that each asset you upload is high quality! NOTE: There is a 10MB size limit for videos.
Would you like to show pictures to attract customers?
Set the toggle to ‘Yes’ if you would like to show pictures. If not, set the toggle to ‘No.’
If yes, add pictures that may interest customers.
Just click the +Add Image button to add images. If you are a services business, good pictures to upload might be before and after pictures of projects, pictures of your facilities or your team members. If you are a products-based business, images of your product line are very attractive to show here and will complement your website well.
Use the Title and Description sections when uploading your images to provide detail for your website visitors.
Would you like to show videos to attract customers?
Set the toggle to ‘Yes’ if you would like to show videos. If not, set the toggle to ‘No.’
If yes, add a video that may interest customers.
Just click the +Add Video button to add videos. Videos are a great way to engage website visitors and provide a specific message to them about your specialties, new offerings or promotions. Use the Title and Description sections when uploading your videos to provide detail for your website visitors.
This section allows your digital receptionist to prompt website visitors to learn more about your offerings. Depending on the type of business you are, you may offer products, services or both.
Use the radio button options to indicate what is relevant for your business. Choose ‘None’ if you do not want the digital receptionist to highlight your offerings.
Services
Service Highlights
This is not meant to be an overly detailed summary of your services. We recommend 200 – 400 characters to describe your services at a high level in a way that encourages website visitors to want to know more or reach out to you to get a quote or schedule an appointment with you. When you move to Step 2 of setup, you will be given the ability to provide more in-depth information about each of your services.
Cost of the services
This field is intended to indicate if you have fixed pricing and what it is or if you provide a custom quote process.
Link to the services page
If you have a Services page on your website, go ahead and enter it here.
Products
Product highlights
This is not meant to be an overly detailed summary of your products. We recommend 200 – 400 characters to describe your product offerings in a way that encourages website visitors to want to know more or reach out to you to make a purchase. When you move to Step 2 of setup, you will be given the ability to provide more in-depth information about each of your products.
Cost of the products
This field is intended to indicate if you have fixed pricing and what it is or if you provide a custom quote process.
Link to the products page
If you have a Products page on your website, go ahead and enter it here.
Your digital receptionist will prompt website visitors to ask about your promotions. This is a great way to further engage with prospects and convert them into leads and customers.
Would you like the digital receptionist to show any promotions?
Set the toggle to ‘Yes’ if you would like to show promotions. If not, set the toggle to ‘No.’
Promotions highlights
Here you will want to provide a description of the offer such as “free analysis for first time customers,” “10% off any competitor quote” or “30 days free trial.” Just be sure to update this section as you change offers at your business or on your website!
Link to promotions page
If you have a Promotions page, enter the URL for that page here.
If your business has great online review listed on your Google My Business page or other online reviews source, you can choose to have the digital receptionist show off how much customers like you.
1 – Login to your account and click on the Settings icon > Click on the Reviews card
2 – Toggle ‘Do you want the digital receptionist to show your online reviews?’ to ‘Yes’
3 – Enter the website URL that links to your reviews in the Link field
Your pre-trained library contains questions & answers you can choose to use and you can also add your own at any time. The more commonly asked questions you enable the digital receptionist to answer, the better the experience for your website visitors and the more leads you will receive as a result.
There is no right or wrong number of questions & answers to provide, just start by leveraging what has been made available to you and then go from there.
Our pre-trained library is a combination of commonly asked questions that can apply to many types of businesses as well as, in some cases, industry-specific questions & answers that have been developed for your digital receptionist based on common use cases. When registering, if you selected one of our pre-trained industries, you will have access to corresponding categories. If not, you will still have access to our library of commonly asked business questions.
Your Knowledgebase is organized with Categories that house Topics within them. Each Topic can have one or more Questions assigned to it. This tree structure enables you to manage your Questions & Answers efficiently.
An example Category might be My Business with a Topic of ‘Cancelation Policy’ and a Question ‘What is your cancelation policy?’
Adding your own custom questions & answers is a great way to personalize the experience for your website visitors and ensure that they have a great experience with your business. Robust questions & answers will save you time and result in more leads and customers for your business.
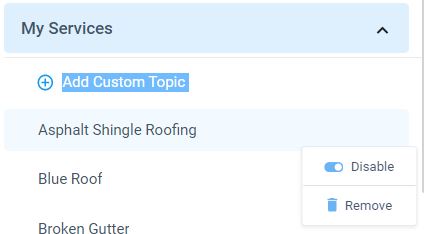
Step 1. Identify which Category you want to add your Topic and Question to on the left hand panel of your Knowledgebase and click ‘Add Custom Topic.’ Enter a name for your Topic in the field.
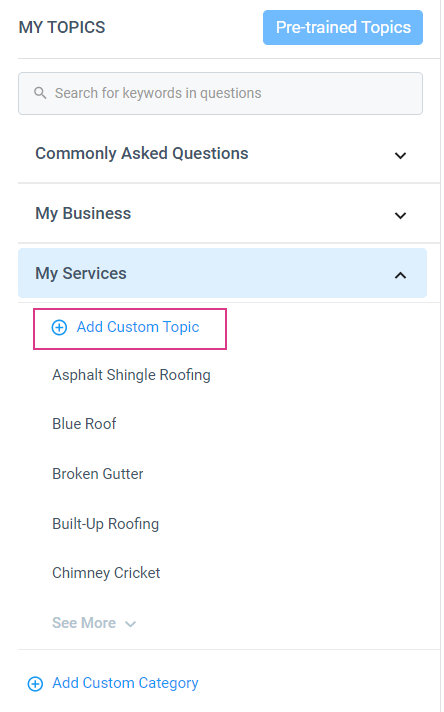
Step 2. Click on your new Topic identified by the blue Review QnA icon.
![]()
Step 3. To get you started, your Knowledgebase may pre-populate some commonly asked question formats for you to review and edit. You can also add your own custom questions by clicking the blue Add Custom Questions button at the top right. Think about the most common questions your customers ask and use those to start customizing your own library.
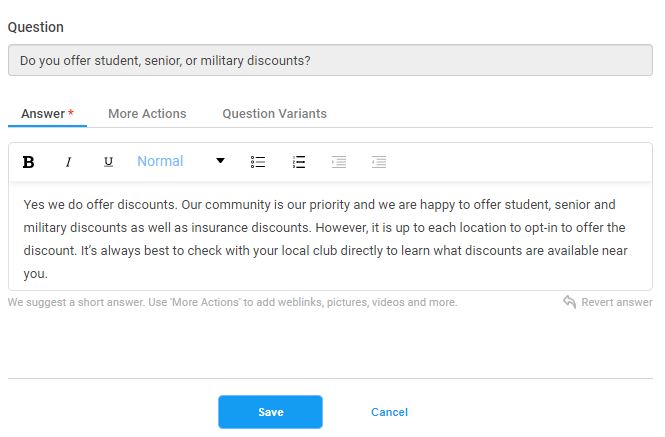
In the Answer field, provide the response to the question. We provide basic formatting capabilities – great for emphasizing certain information or using bulleted lists.

Additional enhancements:
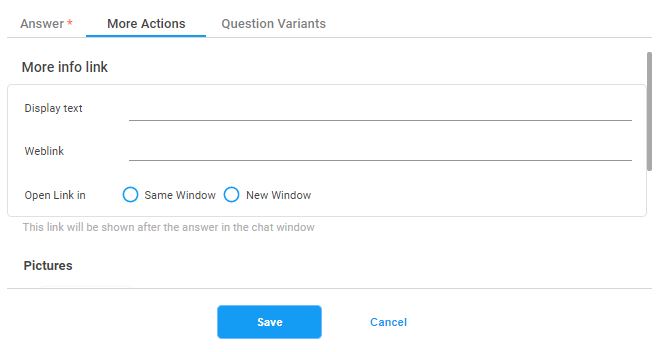
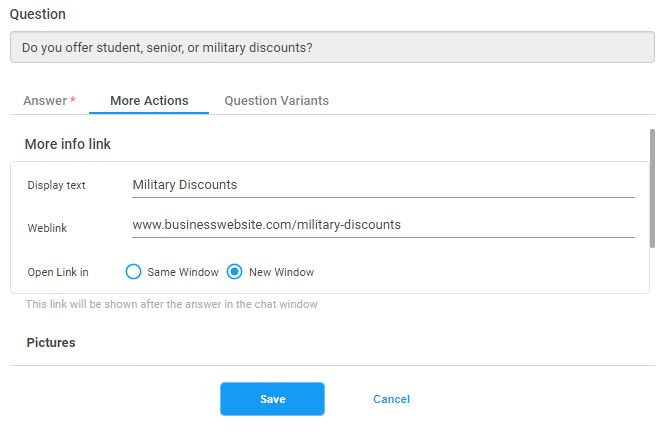
More Actions. If you want to append to your answer specific images, videos or a URL link, you can add those here. This is a great way to support products or services based questions and drive users to specific call-to-action oriented pages on your website.
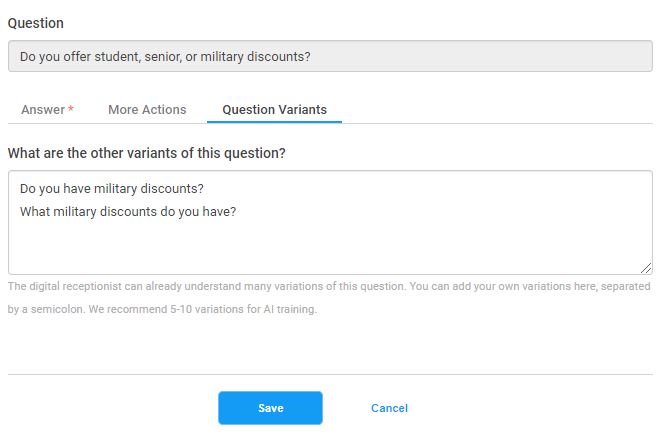
Question Variants. If there are multiple ways a customer might ask a question to get to this same answer, you can go ahead and add them here. TIP: Be sure that you don’t enter the same Question Variant in multiple questions or the digital receptionist may not know which answer to provide. Once you are done revising your answer, click the Save button.
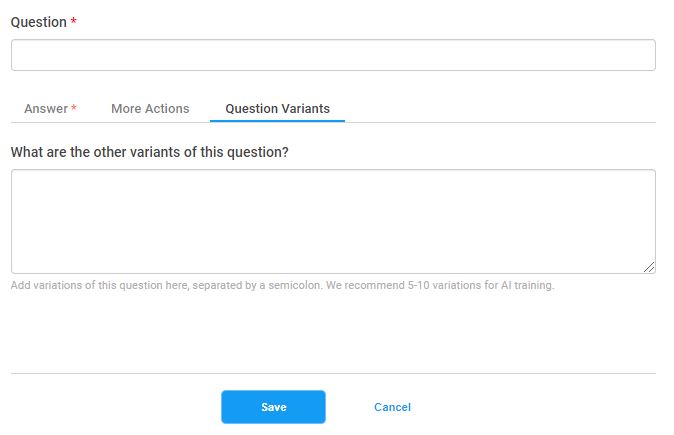
NOTE: Any new question has to be “learned” by the digital receptionist. This typically takes from 24 – 72 hours.
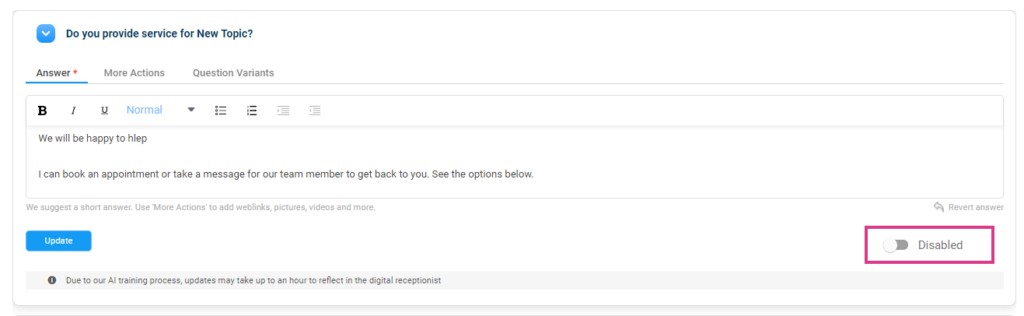
Disabling a Question
You can always disable a question by setting the Enabled toggle to ‘Disabled.’
Watch our video to learn more:
Select the pre-trained questions & answers you want to use:
Step 1. Login to your account and click on the Settings icon at the bottom left. Click on the Knowledgebase card.
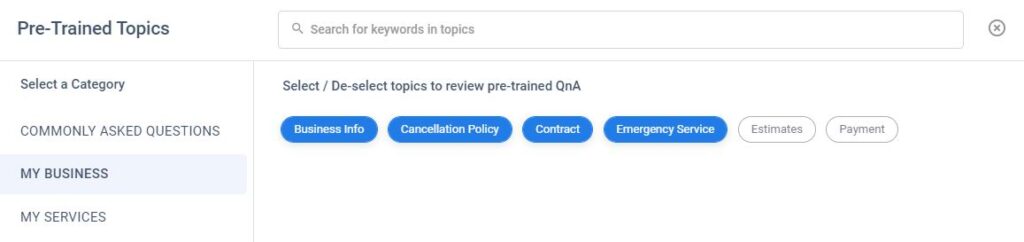
Step 2. Click on the Pre-trained Topics button at the top left
Step 3. In the pop-up window, select a Category on the left and then click on each Topic that you want your digital receptionist to be able to answer questions about. Enabled Topics will be highlighted in blue. Once you have reviewed the Topics within each Category and added the ones you want, click the Done button
Step 4. Once you enable Topics for your knowledgebase, you will want to review the answer for each one and customize to fit your specific needs. To do so:
1 – Click on a Topic within the Category tree in the left-hand panel
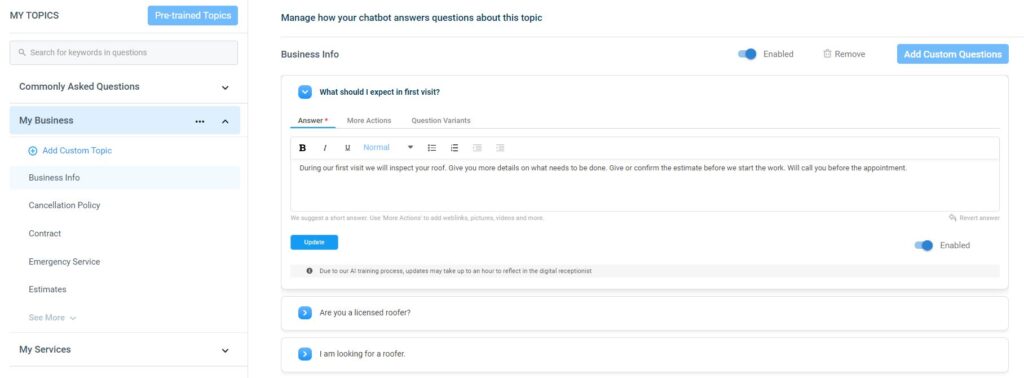
There are three sections to review and update:
Answer. Here you can change the pre-trained answer. We provide basic formatting capabilities – great for emphasizing certain information or using bulleted lists.
More Actions. If you want to append to your answer specific images, videos or a URL link, you can add those here. This is a great way to support products or services based questions and drive users to specific call-to-action oriented pages on your website.
Question Variants. If there are multiple ways a customer might ask a question to get to this same answer, you can go ahead and add them here. TIP: All of the pre-trained library questions & answers already have this built into the back-end database even though you will not see them here. Be sure that you don’t enter the same Question Variant in multiple questions or the digital receptionist may not know which answer to provide.
Once you are done revising your answer, click the Update button.
NOTE: Since questions & answers in the pre-trained library are already “learned” by the digital receptionist, you are unable to modify the text of the question itself.
Since questions & answers in the pre-trained library are already “learned” by the digital receptionist, you are unable to modify the text of the question itself.
You can, however, always modify the answer as well as add additional question variants (other ways people may ask the same question) to further customize the question to be your own.
Alternatively, you an opt to NOT use a pre-trained question if isn’t quote right for you and, instead, create your own custom question & answer.
To remove a question from your Knowledgebase, click on the question to reach the Edit screen. At the bottom right set the Toggle to ‘Disabled.’

You can Disable or Remove a Topic from your Knowledgebase by highlighting the Topic within your Category tree and when you see the three dots appear to the right of the Topic name, click on them to access the actions menu. Select Disable to turn off a Topic and select Remove to delete.
Your digital receptionist will automatically send an SMS acknowledgement to all new customers that submit their information through the chatbot.
On the SMS Auto Replies card:
1 – Set the “Automatically send acknowledgement text to new customers?” to ‘Yes.’
2 – In the ‘Auto-acknowledgement text’ field enter a brief message. Feel free to use the default or customize your own. This is the text message that will be sent to new customers
To turn SMS auto-reply message on/off:
1. Login to your dashboard and click on the Settings icon on the lower left hand of your menu.
2. Click on the SMS Auto Replies card
3. Toggle the “Automatically send acknowledgement text to new customers” “Yes” to activate SMS auto-acknowledgements or “No” to disable. When SMS is “On”, any time a new customer contacts you through the digital receptionist, an auto-reply will go out to them confirming that you have received their message.
Fortunately, spam is near non-existent through the Agentz bot. Before initiating a new chat session, we check the user’s browser data (which automatically gets sent by whatever browser they are using) for any signs of bot information. If so, we do not initiate a session and the chat window does not load.
For missed call handling, because calls are initiated to the business number and not the Agentz terminating number, we are unable to provide any preventative measures to block robocallers.
Videos no larger than 10MB can be uploaded to your profile. You can add or remove videos by going to Settings > Pictures & Videos.
STEP 1: Grab the snippet of code from within the Agentz dashboard.
1. Login to your Agentz dashboard and click on the Settings icon at the bottom of the left hand menu
2. Click on the Install Chatbot card
3. You can either copy the snippet to your copy ‘n paste function or email the snippet to your webmaster for installation.

Make sure that you activate the digital receptionist on the Deploy screen so that it automatically appears once the snippet of javascript is successfully added to your website.

STEP 2: Add to your website Copy and paste the following code snippet before the tag on every page you want the digital receptionist to appear.
Pixel installation Guide
For specific instructions on how to add the pixel to many of the most common website builders, refer to our Pixel Installation Guide.
Testing your javascript installation
You will know the javascript snippet has been successfully added when you refresh your website and the digital receptionist initiates on the page.
Using the Header and Message fields you can customize what you want the digital receptionist to say at the top when users come to your website. You can stick with the default or change it to a customized greeting. You can even use that area to make special announcements that you want your website visitors to see quickly.
